Tuesday, November 3, 2015

How to Make Home Made Rivet Setters

     Rivet setters are pieces of round bar, cylindrical steel, about 3/8 or 1/2 " in diameter, and about five inches long.  Sometimes one end is slightly concave, or spread, but many of use them flat.  Remember that whatever the shape of the end of your rivet looks like will be reproduced on the top of the rivet itself during setting.  Thats why some are concave, to preserve the dome shape of the rivet top, and manyt of us polish the end too so that the dome comes out nice and shiny too.  The difference between rivet setters and snap setters is that snap setters require two different types of tools for each half of the snap, and each has a burr or a hole in it to accomodate a recess in the snap itself.  As well, the snaps require a special plate with holes in it, and different snaps take different sets.  Your best bet is to obtain a commercial set if you are setting snaps, or study the commercial sets to see what you need to make. 

     There is a special setter for copper rivets but an old defunct hole punch can be used to slide over the post and tighten the second washer before clipping.  This is what I use and the hole punch should be larger in diameter than the post of the copper rivets, but not too wode so that it falls over the edge of the washer.

     When setting your regular two piece rivets, which are usually brass (The good ones) or brass plated steel (Not as good but a lot cheaper....these rust) a simple hammer strike works fine, and the flat look is desirtable to some of us.  Make sure any hammer you strike with has a polished surface, ort set the rivet by hitting the bottom and driving it into thge cap which should rest on a very smooth metal or stone surface.  Metal ius better.

     It is not hard to polish metal surfaces with sandpaper or silicon carbide cloth.


Information About Making Good Leather Work Surfaces


11.  Work surfaces

     All leather crafts people require a good work surface.  These can be made of many things, and there are quite a number of fairly expensive types available at leather crafts supply stores.  My favorite work surface ever is a p[iece of nylon board which was retrieved from a dumpster by a buddy of mine.  It is two inches thick and bionic.  I have used it to pound on for years and years and it is a marvelous tool.  It is about two feet by three feet, and if it had not been salvaged wold have cost over 100 dollars.  It was free for me, it had a piece sticking out that my friend wanted, so I trimmed it off with a table saw and made off with the rest.  What a deal.  A lot of leathersmits use wood as a a surface, and a large tree trunk or 6" sdlab of trunk is good, but you always want to punch down into the grain not across it.  Wood tears up very fast too.  Most work boards should be softer then the metal of your tools, thatys their purpose actually.  You don't want to mar your tools edge, hole punches and the like, by poounding through the leather into something hard.  A lot of people use polished marble slabs or granite slabs when they are tooling leather with stamping or cutting tools and tyhats because tyhose tools never punch THROUGH the leather.  When stamping you always wety the leather thorughly (Case it) and then use a hard flat surface to stamp your design.  Otherwise you want wood, or hard plastic to punch into.

     The exception to the above is when setting rivets or other fasteners which are struck forcefully, then you want a polished or at least smooth metal surface, like a metal plate, or even a nice flat anvil surface.  There is a tool which many leather people use called a steel shoe last or Dragon Last, and it is handy for setting rivets inside cases, and snaps too.  It can be turned several different ways to preesent different surfaces, and was developed for the shoe making industry, though it has application when making bags too.


How To Make Copper Rivets

10.  Making copper rivets

     Copper rivets can be made with small sections of  heavy caliber copper wire and 2 washers that closely fit the diameter of said wire.  3-4 mm (1/8 to 3/16) or larger diameter wire can and should be used.  Here again planishing is necessary.  One end of the copper wire is spread open into a flat cap-like form.  Holes drilled in your metal plate will help this operation.  If you really get into making your own copper rivets its a good idea to make a form for yourself, to make life easier and make the rivets more uniform.  Study the commercial varieties and learn from them.

A washer is pushed onto the wire so it fits tightly against the planished end, the cap.  The unplanished end is then put through a tight fitting hole in the leathers being fastened, and the remaining washer, is placed over the protruding end of wire.  Pushing down on that washer will cinch the join up, and needle nosed pliers help accomplish this.  Then trim any excess copper wire, usually with cutting pliers, and planish the second end of the wire into a cap.  Make sure the bottom of the rivet is on a hard metal surface, so that the planishing action at the top is not hindered by the entire work giving way.

Home Made Leather Cutting Methods And Tools

9.  Cutting leather

     Many advanced craftsman use what is called a Craft Knife to cut their leather, and it can be used as a leather thinner, a skive or skife, as well.  The craft knives are not very expensive and are a worthy investment, though a lot of leatherwork can be accomplished with some kitchen knives repurposed into leather tools, and even heavy scissors are a mainstay of the leather shop.  Many people prefer scissors in fact, though there are limits to what they will perform. 

One of my favorite innovations or perhaps tricks is a better word is use of a chop knife.  I just use my mallet to strike a blade so that it chops in a straight line across a piece of leather with hardly any effort at all.  Old bread knives modified into long craft type knives usually lend themselves well to this operation, and just about any knife can be adopted as a chop knife.  Keep safety in mind and especially keep your fingers clear.  Striking the knife could cause it to pinch your findgers against the cutting surface if you are not ready for it.

Below are some cutting tools for leather of various types.  Some Commercial and some home made.  The long kitchen knives are good for chopping long straight edges in heavy leather.


How to Make Home Made Stamping Tools

8. Stamping tools

     One of the easiest leather tools to make, and some of the more expenisve types too, are stamping tools for making designs into heavier leathers by hitting the stamping tool with a hammer.  Large nails with flat heads are required for this job, and the nail points, the end which is driven into the wood, must be cut or ground off.  Study commercially available tools for your designs, and also invent your own.  You can duplicate any leather stamping tool made with a little time and patience.  Use files and Drill Bits to create youor designs.

     You can teach yourself to stamp designs in leather by starting with measured geometric patterns, then moving onto more intricate things.  Use your edge liner, or a ruler and an awl to create boundaries along which you can stamp your designs and keep them uniform. If you wish to cut your design into leather, it is probably best to obtain a commercially made swivel knife, though decorative cuts can also be made with other tools like a butter knife sharpened into a point, and along one edge.


How To Make Awls


 7.  Push Awls

     A very handy tool is called an awl, it is a piece of sturdy round metal with a point ground onto the end of it.  It can be used to make holes or widen holes, and for many other things.  Imagine a screwdriver with a sharp point ground onto the end -- that is exactly what an awl is, and they are one of the easier tools to make.  Old leather crafters used them in lieu of the multi-pronged punches, making one hole at a time by pushing the awl point through the leather.  It is good to have several different sizes, and if the metal part of the screwdriver is a little long, shorten it by cutting with a hacksaw before grinding a point on it.  Leave about 3" or so on larger awls and less on smaller ones.  It is best to have somewhat of a rouynded tip, versus a really sharp tip which could puncture your skin in use.

The middle tool is a beat up philips screwdriver of which everyone must have a few.  They can be easily sharpened to a point, even on a sidewalk and then they become an awl. Very useful for heavy sewing.


How To Make Large Round Hole Punches

6.  Round and Oblong Hole Punches

     Round hole punches are many times necessary in leather work for allowing straps to pass through as fastening agents, or for placing other types of fasteners such as rivets.  Round punches can be made from various types of steel pipe, sharpened along the lower edge.  Strike only with wooden or rawhide mallets.  The leather discs created by hole punching will pile up inside the pipe and can be removed easily.  Save those for buttons or for other uses you will come across as time goes on.  The best pipe for hole punches I have come across is the steel used in golf club shafts.  It can be cut with a tubing cutter, and can be sharpened easily and with an edge that holds.  The high quality steel alloy used in metal gold club shafts is some real space age material, and would be costly if you were not salvaging.  I bought a complet set of putters, drivers, and irons at a thrift shop last year for ten dollars.   The tubing available this way also tapers along the shaft so that each shaft will make a selection of sizes.   I have all the high quality tubing I could ever use for making leather tools now.  Again a cheap tubing cutter works very well to cut this high quality tubing, just be careful because the edges you put on it with your files will be almost razor sharp.  Which is nice of course, but you are made of leather too, remember that.

     Sometimes oblong punches can be made this way as well, by hammering out the end of a pipe into the shape you need, and attempts should be made if possible because the oblong punches are some of the more expensive hole punches.  Golf club tubing does not work too well for this, it is brittle and does not take deformation well, but some of the galvanized pipe will work, especially if it is heated to a dull red first, then left to cool without quenching.  That process is called annealing and will soften the metal enough to be hammered into an oblong shape.  Sharpening of the oblong punches is a little trickier than the sharpening of round punches but it can be done with a little patience.  Patience is one of the best tools of any craftsman.

A couple of pictures of an oblong punch, then golf club tube and a tubing cutter.


How To Make Leather Mallets And Hammers


5. Wood mallet

Wood or rawhide mallets are necessary when doing leather work, and thats to preserve your tools.  Ifg you go to hitting on your tools with metal hammers you will soon deform and eventually destyroy your tools, and thats not nice.  Even though you can make your own tools after reading this, its better to spend your time crafting leather articles with your repertoire versus spending your time continually making more tools.  Many leather crafters use a rawhide mallet, and they are not too expensive, but they can be replaced with a piece of heavy round wood stock about a foot long.  The harder the wood tyhe better, but scraps work well too, and even rectangular or square pieces of the right length can be used, though most people find the round cyclindrical stock easier to handle.  You may want to sand your wood mallets and even varnish them.  Do not spend too much time though because the end of your wooden mallet will eventually become unusable and must either be trimmed or another piece of wood obtained.  Different sizes come in handy because different weights serve different purposes.  Large holes need a heavier mallet, while smaller prong holes can be accomplished uitre easily with smaller stock.  If you whittle at all, and it is worth learning if you can keep it safe, you can form a ball on the end of your mallet then sand it smooth.  Study the various types of rawhide and wooden mallets available commercially and get an idea for yours.   Study the prices too and you will see the real value in making your own striking units.

     Types of wood for your mallets is important to learn, a lot of people like maple but it is cost prohibitive, and all the wood I have ever used splinters and chips over time, including maple, which is one of the main reasons I try to make my own tools when I can, because no matter the quality of some tools, wearing them out quickly is sometimes inherent to the materials.  Some newer mallets are made out of nylon or other plastics, and I have seen a lot less wear on them though they tend to bounce when hit.  If you are into using a lathe for wood you can easily make four or five mallets from 4x4 or 6x6 stock that will last a long time.  When one wears out throw it in the fire and get another.  Oak is a good wood, and some of the exotic hardwoods too, but they can be pretty expensive unless you have a way of salvaging pieces for use as hammers on your leather tools.  I have salvaged some very good wood over time from cabinet shops, and also off wooden pallets of all places.  The pallet wood many times is super strong and chosen for that because it is handled by forklifts and other heavy equipment.  Below a picture of commercial leather hammers.  Reproduce in wood, even whittle 2x4.


How To Make Good Sewing Needles

4.sewing needles

     One of the hardest things to find today is a good, commerically available sewing needle to sew your leather.   Most leathersmiths today use a straight steel needle with nylon thread to fasten our edges, once the pronged punches have made nice neat holes along the edge of  the leathers.  I had always been plagued by lightweight steel needles which I bought asw leather sewing needles, but never lasted long and were quite expensive.  Once, I got ahold of a package of british leather sewing needles and they were well made and quite hardy in their make up.  I bought 25 of them and was very sorry to see tyhe last one break, because they were the best Ihad ever had, even though they were quite expensive.  The leather shop where I bought them had closed in the mean time, like so many others, and I was on the outside looking in, again, until I took the reins into my own hands and developed the technique which follows.  Now I am never short of needles, and I make them mytself out of very sturdy material.  The more I use them the easier they become to use as they wear into a nice polished surface.

     A friend of mine sold me a bunch of junk bicycles and I bought them because of the titanium and other special alloy stock which comprises them.  One of the things I salvaged were spokes from the broken wheels: I literally acquired thousands of these spokes even though I did not really know what I was going to do with them in the beginning.  Well.  Those spokes have come in handy for many things, and one of them is making my own leather sewing needles.  They are nearly perfect for the job, and can be cut to any length I require, though I generally make my needles about three (3) inches long, and of a  standard type. 

     The only hard part of the project is drilling the holes after one end has been squashed flat on the anvil with a small hammer.  This is called planishing, and the end should be squashed just wide enough to accomodate a small diameter hole which has to be carefull drilled into it.  The pictures will give you a good idea of what the finished spoke needles look like.  The spokes are very cheap and mistakes are ok because it won't take long for you to get the hang of it.  Once you do get your technique down you can do a lifetimes supply of needles in one day, and you can even trade these items to other crafts people.  I sharpen my needle ends to a rounded point because it does not have to pierce anything, it just has to pass through the holes punched with my pronged hole punches.  I get about 3 or 4 needles per spoke, and store them in an airtight container, though I have had no problems with rust because the alloy used for spokes on bicycles is some high grade metal.  High.  Grade.

      If you were to hgave to buy that metal stock new, it would cost a lot more than if you bought a junked bicycle wheel and clipped the spokes out of it with a pair of cutting pliers.  The small drill bits to make holes in the planished ends of the needles are sometimes hard to acquire, but some hardware stores still carry them.  Otherwise seartch online at ebay or Indian Jewelers Supply.   I use a small foredom handpiece to drill my needles because my electric drill was just too big to get any consistency.  Dremel and Ryobi make small hand held units, and used dental equipment also comes in flex shaft/chuck configurations.  Finally, once again, Harbor Freight has flex shaft chucks you can actually put on your drill and use that way with small bits, and they are a worthy investment for this kind of tool making.

     I have not yet found a way to create flat lacing needles that are superior to the store bought type.  The lacing needles available at the leather supply stores are of fairly high quality, and are mass produced by machines which punch the steel so that the needle incorporates  a hole with two barbs protruding through it.   Then this small siver of steel is center folded along its length into a double layer of metal which is separated only at the end to correspond with the hole and its barbs.  This is hard to duplicate by hand processes, and would cost more to produce at home than they can be purchased for.  This type of needle is used for flat leather lacing like calf skin or goat or kangaroo lace, which are used for decorative finishes around the edges of leather projects such as wallets.


How To Make Multi-Pronged Leather punches From Forks

3.  Pronged Lacing Hole Punches

     In order to do most types of stitching you will require what are called pronged punches.  The multi-pronged punches make life a lot easier because they punch 3 or 4 holes at a time.  Good spacing is achieved by placing the first prong in the last hole punched, as you move along the edge of the project.  Single prong punches are also necessary because of odd spacing requirements around corners or curves, and they are easy to make by sharpening a nails point until its flat.  The multi pronged punches are made from stainless forks, and heavy duty forks are best if you can hunt them up at the fleamarket or thrift store where you obtain your stock. 

     The pictures are pretty explanatory here, just remember that the prongs do not have to be over long and the shorter they are (And still get the job done) the better, because they will be stronger.  You can insert the end to be struck into a drilled piece of nylon plastic or wood, and adhere with epoxy to give yourself a handle.  Remember when punching holes to stay far enough away from the edge so that the leather is not weakened by tyhe holes, but not too far or you will have a flapping action at the edges after the pieces are sewn.  Different leathers and different thicknesses of those leathers dictate a variety of approaches.  About 1/4" is usually good as an all around measurement.  As with anything, the more you do it the better you will be able to judge. 

     Overall you take a 3 or 4 tined fork, cut the ties short, grind the tines into chisel points, straighten the handle, insert into a wood or plastic handle that will take tapping by a hammer, and there you have your prong punch.  You can make as many as you need in different sizes by using diferent fork sizes. Along with the edge guide liner, these tools will make your leather work professional in its appearance.


How to Make An Edge Liner

2. The First Tool For Correct Leather Sewing

     A major part of leather work is the sewing of leather to fasten pieces together.  There are several steps to doing it right, and correct sewing makes the real difference between a professional job and something that does not look very good.  The first step to sewing is to mark the edges in a straight line so that the multi-pronged hole punch has a guide to follw.  If this is not done, and done correctly, it is very easy to deviate away from the edge in your hole punching, and this will always ruin the look of a piece of leather work, and sometimes it will even weaken a piece of work.  A lot of leather workers use dividers that can be adjusted in width so that the distance from the edge of the leather can be made smaller or larger.  This is ok if you have the money for a set of dividers, but a good pair can be expensive, and add a good little bit to your overall costs.

     A good tool for making guide lines along the edge of leather can be fashioned from a stainless steel fork.  Stainless forks knives and spoons can usually be gotten at thrift stores for pennies, and I do mena pennies.  The last batch of stainless flatware I bought to fashion tools with cost me five cents each, and I had a choice from a huge box of the things.  Yes that was a nickle a piece, and a dollar bought me more than I could use in several years time.  This type of thing is the true advantage to knowing about leather tools and how to make them from scratch yourself. 

     By bending the tongs of a stainless fork (See Illustration) I was able to make an edge liner that worked even better than my dividers.  It can be adjusted by further bending or another fork can be used to make greater or lesser degrees of width from the edge of the leather.  The fork is drawn along an edge of leather so that one of the tines is guided by the edge, and a second tine marks inward along the edge in a uniform way.  This line which is marked on the leather is used as a guide when punching holes.  Further more, if you are using a single hole punch versus a multi-pronged punch, you can use another fork with all but two tines bent up out of the way to correctly space your holes in a uniform manner.


How to Make An Edge Beveler From A Fork

1. Edge Beveler

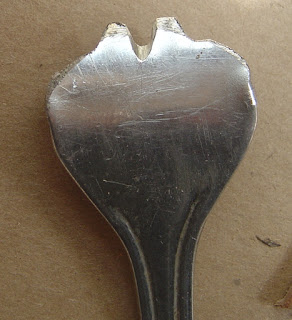
     The one tool that sets amateur and professional work apart is the edge beveler.  If you have any doubts about that statement, do an experiment with a small project like a keyfob or hair bartette.  Do one of each, with the edge finished by beveling, and one without edge beveling.  You will see the difference immediately.  The edge beveler is a piece of metal with a v shape cut into it, which is sharpened so that it removes the corner along the edge of a cut piece of leather.  Some edges can be left unbeveled if they are to be stitched with leather lace, such as with the double loop stitch in calf skin lacing, but most professional leather workers jhave gotten intot the the habit of beveling all edges just as a general proactice.  And even if you are lacing the edges with flat lace, beveling will add to the finsihed look, which you can also experiment with on your own using scraps. 

     The edge beveler has to take a lot of abuse so you will want as heavy duty four-tine fork as you can find.  Totally remove the two outside tines, and remove most of the inside two, so that your v shape can be ground there.  The sharper you can make that v shape the better the edge beveler will be at cuttong the corners of leaterh. It must be sharpened as illustrated, and that is not tedious or difficult but must be learned to be correctly done.  Take the time to do it right and you will have a nice tool which will save you money and you can even have 5 of them if you wanty, in different sizes.  Because there are many thicknesses of leather, I highly recommend that you make as many as you need for the various leather thicknesses in your work. 

     Put a good wooden handle about three or four inches long onto the shortened fork handle, and fasten with good epoxy.  You will have to learn to use your own tool to its maximum, for whatever you are doing, ut it can be done quickly, the learning i mean, and is not too hard to do.The wooden handle can be shaped by whittling or grinding and sanding or both.  If whittling, do be careful.  All knives should always be respectfully handled, especially when you are applying force to them.


How To Make Leather Tools

     Tools for working leather are highly specialized and therefore costly.  Also, a leathersmith needs many different kinds of tools, and even the lesser types still add up dollar-wise, making the craft cost prohibitive for many people.  Not all leather tools lend themselves well to home made processes, but some do, and by making as many tools as you can it is possible to save a lot of money, and even make better tools than you can buy. 

     Leather itself is one of the most costly materials to use when making garments or cases or even footwear, though because of its durability it is the best deal over the long haul.  By FAR the best deal.  Leather is a natural material as well, and thus biodegradeable; if you are worried about the landfills growing gigantic from the amount of plastic deposited in them, as many of us are, then leather will help you do your part in decreasing the problem.     Also you can bring American work home, literally, by crafting some of your own goods, and you can easily make items to wear which are far superior to a lot of the imported goods you see around town.  You can even go into the business of making things, or trade what you make with your friends for other things you need.  It is very much a win-win situation.

     Many leather tools can be made without heat treatment, but by heating metals and learning to temper them you can make a greater variety of tools, and you can make stronger tools too.  If you want to learn how to heat metals to make tools you can study blacksmithing.  There are numerous books around concerning that vocation, and I highly recommend the online pdf called BASIC BLACKSMITHING  by David Harries and Bernard Heer.  It is simple and to the point, and it covers all the techniques and tools you will need to learn blacksmithing.   To make most leather tools blacksmithing is not a requirement though.  The variety of metals available to people today makes tool making a lot easier than it ever has been before.  Stainless tableware like knives, forks, and spoons can be used to fashion many useful tools for the leathercrafter, and things like old golf clubs and bicycle parts can be repurposed easily to make excellent leather working tools of high quality too.

     To begin you will need a few basic power tools, like an electric drill, and a motor powered grinding wheel.  Some people use just the drill with attachments, clamping the drill to the bench when needed.  That does work and I have done it myself in the past.  Small grinding wheels and bits are available for all drills in most hardware supplies.

     Many electric motors can be had very cheaply or even free if you are a good salvage person, and there are lots of mandrels now being made and sold by shops such as Harbor Freight which slide over a motors shaft and are fastened with set screws.  These are threaded mandrels and will accept grinding wheels and buffing wheels.  They are made to fit all kinds of motor shafts, from 1/4" up to 5/8" and even larger. Harbor Freight also has flex shaft chucks you can actually put on your drill or grinding motor, and they are a worthy investment for this kind of tool making.  WHEN WORKING WITH MOTORS MOST TIMES SMALLER AND SLOWER IS BETTER.  Modern mandrel attachments also accept muslin or felt buffing wheels, to polish metals and other hard materials, and there are even expandable sanding drums in miniature made for motor chucks and mandrels.
 
     As for other tools, a hacksaw is somewhat of a necessity for this type of tool making process, and some good heavy cutting pliers, like lines-man pliers.  Line up a few small files for sharpening your tools, a round and flat file will get you buy in the beginning, and some good silicon carbide sandpaper or cloth.  Get a few pieces of steel plate to work on as well, things that can be hammered upon without worry of deformation.  A bench vise will also be very handy, and sometimes these incorporate a horn and a flat surface for forming metals.  If you do not have a bench vise you can use regular C-Clamps or other types of clamps which will securely hold your work onto a bench top.

    Always use safety glasses and be careful not to get clothing or fingers or jewelry near moving wheels.  Especially keep jewelry away.

Below is some of my past leather work.